


Hello Guitar!
In this introductory lesson, we will learn about the anatomy of a guitar and how it works.
1.1 Types of Guitars
Guitars come in three main types:
- classical guitars (with metal + nylon strings)
- acoustic guitars (with metal strings)
- electric guitars (with solid bodies)

You can learn to play using any type of guitar but the recommendations below can greatly improve your chances of mastery:
- Size matters!
Choose a guitar size/ shape that is comfortable to hold and play. - Get a proper setup!
"Setup" in guitar terms are tweaks to optimise the height of the strings from the fretboard for ease of playing.
Learning to play using a guitar that has been properly set-up would be less painful on the fingers.
1.2 Parts of a Guitar
Just like you don’t need to know all the parts of a car to be able to drive it, you do not need to know every single part of a guitar.
Knowing the parts shown in the diagram would suffice.

1.3 Holding the Guitar

1.4 Guitar Theory
Notes are sounded when the strings vibrate.
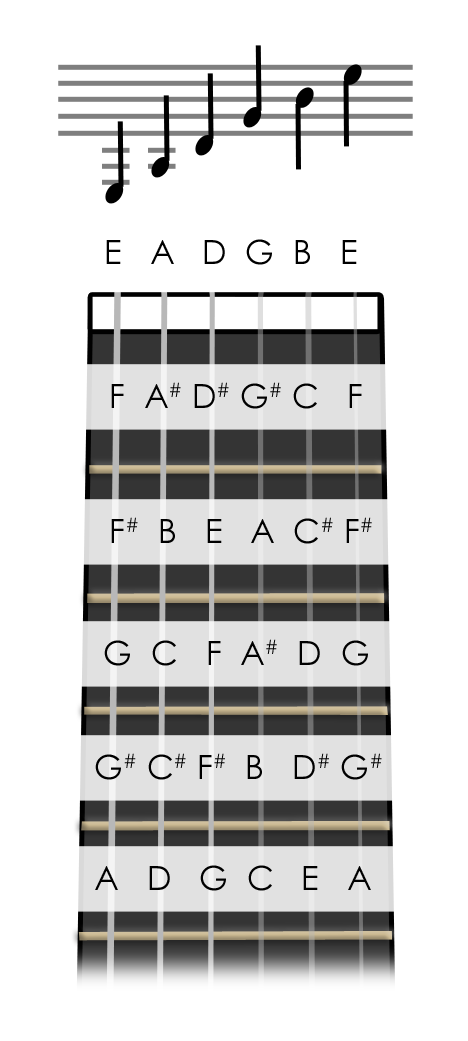
The open strings on the guitar (without pressing on any frets) correspond to the following notes:
Pressing each higher fret corresponds to a half-step / semitone in music theory i.e. C → C#; E → F (see diagram)
1.5 Tuning the Guitar
Use the Guitar Tuner below to tune each string. It works in your phone or computer browser and needs no download.
How to use:
- Press Start tuner in the tuner above and allow microphone access when your browser asks. Position your device near the guitar.
- Choose the 1st string (high E) in the tuner, then pluck the open string.
- If the string is in-tune, the needle will sit in the green zone and the tuner will show “In tune”.
- Otherwise, the words “Flat” (too low) or “Sharp” (too high) will be shown.
- Tighten (for flat) or loosen (for sharp) the tuning key for the string until the tuner shows “In tune”.
Repeat Steps 2-5 for the rest of the strings, choosing each string in the tuner for its respective note.
Not sure what a string should sound like? Press Play reference note to hear the target pitch.
Relative Tuning: 5th Fret Method
Using the 5th fret method, we can tune the strings relative to one another.

The basis of this method is that the note of an open string is the same as that of the 5th fret of the string before it.
For the method to work, you must first ensure that one of the strings is tuned correctly either using the tuner, tuning fork or piano etc and then use that string as the reference.
For example, I would make the 6th string (low E) the reference.
- Play the 5th fret of the 6th (E) string and then play the open 5th (A) string. Their pitches should sound the same. Otherwise, tighten or loosen the 5th string to change the pitch until they sound the same.
- Repeat for the rest of the strings.
When tuning the 2nd string, use the 4th fret of the 3rd (G) string instead.


No comments :
Post a Comment